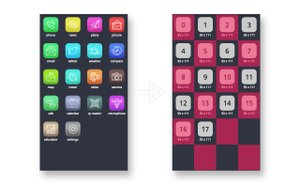
当記事は「DeNA アドベントカレンダー」14 日目の記事です。10 月末、React に「Hooks API」が発表されました。今日はこの React Hooks を利用して iOS でお馴染みの Icon Dashboard を実装します。アイコン配置をドラッグで動かす挙動を通常レイアウトで賄うことは困難なため、独自のレイアウトロジックを組みます。
なお、本稿は「React Hooks 大喜利」一人アドベントカレンダーのスピンオフサンプルです。24 個のサンプルを githubで、実装 Tips を Qiita で毎日公開しています。興味のある方はそちらも覗いて頂けると嬉しいです。また、今回のサンプルは HOF で Hooks API を凝集したり、Custom Hooks のネストをしたりと、大喜利の中で最難関の Custom Hooks になっています。
github : $ yarn spinoff
実装概要
components/records.ts
type Record = {
  title: string;
  iconPath: string;
};
const records: Record[] = [
  // ...
];
アイコン画像とタイトルを保持する配列。この Record 配列とは別に、次の 3 つの配列を利用します。
- タイル矩形配列
- 当たり判定点配列
- indexMapping 配列
実装手順
- 画面サイズからタイル矩形配列を算出
- 画面回転に応じてタイル矩形配列を更新
- 画面サイズから当たり判定点配列を算出
- indexMapping 配列を確保
- TouchMove 時に当たり判定点を捻出
- 当たり判定点から indexMapping 配列を更新
- indexMapping からタイル矩形を参照
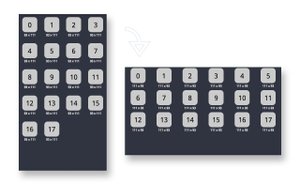
1.画面サイズからタイル矩形配列を算出
はじめに、画面サイズから与えられた縦横分割数でタイル矩形配列を算出する Custom Hooks を用意します。画面リサイズ時に useEffect でタイル矩形配列が更新される様にします。以下の rect は画面サイズを指します。
components/hooks/useTileContainer.ts
const useTileContainer = (props: Props) => {
  const [rect, setRect] = useState(defaultState());
  useEffect(() => {
    const handleResize = () => {
      if (props.ref.current === null) return;
      const { width, height } = props.ref.current.getBoundingClientRect();
      setRect({ width, height });
    };
    handleResize();
    window.addEventListener("resize", handleResize);
    return () => window.removeEventListener("resize", handleResize);
  }, []);
  const itemWidth = useMemo(() => rect.width / props.holizontalCount, [
    rect,
    props.holizontalCount,
  ]);
  const itemHeight = useMemo(() => rect.height / props.verticalCount, [
    rect,
    props.verticalCount,
  ]);
  const itemPoints = useMemo(() => {
    return times(props.verticalCount).map((index) => {
      const y = index * itemHeight;
      return times(props.holizontalCount).map((i) => {
        return { x: i * itemWidth, y };
      });
    });
  }, [itemWidth, itemHeight]);
  return {
    containerWidth: rect.width,
    containerHeight: rect.height,
    itemWidth,
    itemHeight,
    itemPoints,
  };
};
2.画面回転に応じてタイル矩形配列を更新
与えられる縦横分割数は、ポートレート画面比率時の期待値です。画面を横に傾けた時に縦横分割数を反転することで、レイアウトを担保します。先に用意した useTileContainer と切り分け、反転責務はこちらの Custom Hooks で担います。以下のコードで、useTileContainer に値を注入しているのが分かります。useMemo に限らず memoize inputs array は、window.orientation などの window に依存する値も event listener 不要で購読することが可能です(現状挙動)。
components/hooks/useRotateTileContainer.ts
const useRotateTileContainer = (props: Props) => {
  const options = useMemo(
    (): Options =>
      merge(defaultOptions(), {
        verticalCount: props.verticalCount,
        holizontalCount: props.holizontalCount,
      }),
    [props.verticalCount, props.holizontalCount]
  );
  const holizontalCount = useMemo(() => {
    if (window.orientation === undefined) return options.holizontalCount;
    return window.orientation === 0
      ? options.holizontalCount
      : options.verticalCount;
  }, [window.orientation]);
  const verticalCount = useMemo(() => {
    if (window.orientation === undefined) return options.verticalCount;
    return window.orientation === 0
      ? options.verticalCount
      : options.holizontalCount;
  }, [window.orientation]);
  const tileContainer = useMemo(
    () =>
      useTileContainer({
        ref: props.ref,
        verticalCount,
        holizontalCount,
      }),
    [verticalCount, holizontalCount]
  );
  return {
    ...tileContainer,
    holizontalCount,
    verticalCount,
  };
};
3.画面サイズから当たり判定点配列を算出
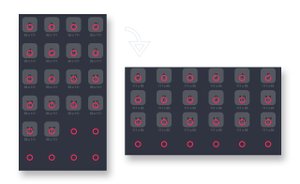
useEffect で算出されたタイル矩形配列から、各々の中央座標を確保します。この中央座標がアイコン配置を変更する「当たり判定点」になります。rotateTileContainer の変化に反応することで、画面回転時に当たり判定点配列も更新します。
components/hooks/effects.ts
const updateHitPoints = (
  update: Dispatch<SetStateAction<State>>,
  records: Record[],
  rotateTileContainer: ReturnType<typeof useRotateTileContainer>
) => {
  useEffect(() => {
    update((_state) => ({
      ..._state,
      hitPoints: records.map((record, index) => {
        const { holizontalCount, itemWidth, itemHeight } = rotateTileContainer;
        const offsetX = index % holizontalCount;
        const offsetY = (index / holizontalCount) >> 0;
        const x = itemWidth * 0.5 + offsetX * itemWidth;
        const y = itemHeight * 0.5 + offsetY * itemHeight;
        return { x, y };
      }),
    }));
  }, [rotateTileContainer.containerWidth]);
};
4.indexMapping 配列を確保
records 配列を操作するよりも「そのアイコンが何番目に位置するか」という index を保持した配列を操作する事で単純に実装出来ます。アイコンを動かしている間は、全てのアイコンが n 番目の index を参照し、自身の座標エイリアスとします。初期値は records の index が入ります。
components/hooks/useIconDashboard.ts
const [state, update] = useState<State>({
  ...defaultState(),
  ...{
    indexMapping: props.records.map((record, i) => i),
    // [0,1,2,...,17]
  },
});
5.TouchMove 時に当たり判定点を捻出
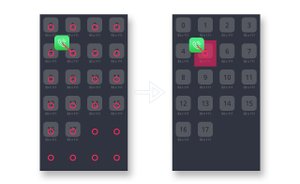
動かしているアイコンの中央座標と、当たり判定点配列の各距離を計算。距離が閾値以下の点を当たり点とし、hitIndex を確保します。Math.sqrt を利用している式が 2 点間距離の演算です。
components/hooks/handlers.ts
const move = (update: Dispatch<SetStateAction<State>>, itemHeight: number) => {
  return ({ center, pointOffset }: MoveProps) => {
    update((_state) => {
      if (!_state.isMouseDown) return _state;
      const hitIndex = _state.hitPoints
        .map(
          (point) =>
            Math.sqrt(
              Math.pow(center.x - point.x, 2) + Math.pow(center.y - point.y, 2)
            ) <
            itemHeight * 0.5
        )
        .findIndex((flag) => flag);
      return {
        ..._state,
        target: { ..._state.target, pointOffset },
        hitIndex: hitIndex === -1 ? _state.hitIndex : hitIndex,
      };
    });
  };
};
6.当たり判定点から indexMapping 配列を更新
hitIndex が得られたので、動かしているアイコン index を hitIndex に位置する場所へ移動させます。
components/hooks/effects.ts
const updateIndexMapping = (
state: State,
update: Dispatch<SetStateAction<State>>
) => {
useEffect(() => {
update((_state) => {
const direction = _state.hitIndex - _state.prevHitIndex;
if (direction === 0) return _state;
const indexMapping = [..._state.indexMapping];
const i = indexMapping.findIndex(
(index) => index === _state.target.index
);
const item = indexMapping[i];
if (direction === -1) {
indexMapping.splice(_state.hitIndex, 0, item);
indexMapping.splice(indexMapping.lastIndexOf(item), 1);
} else {
indexMapping.splice(i, 1);
indexMapping.splice(_state.hitIndex, 0, item);
}
return {
..._state,
indexMapping,
prevHitIndex: _state.hitIndex,
};
});
}, [state.hitIndex]);
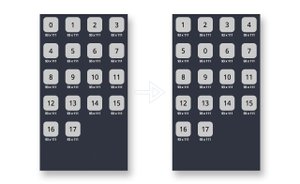
};7.indexMapping からタイル矩形を参照
records の index が props で与えられるので、それを元に mapping index を抽出。mapping index から、n 番目のタイル矩形を参照します。触れているアイコン以外は CSS で transitionDuration が付与されているので、アニメーションロジックは不要。indexMapping 配列を更新するだけで動く仕組みです。
components/items/index.tsx
const elementIndex = props.indexMapping.findIndex((i) => i === index);
const yi = (elementIndex / props.holizontalCount) >> 0;
const xi = elementIndex % props.holizontalCount;
const { x, y } = props.itemPoints[yi][xi];
Tips : 大規模 Custom Hooks の見通し
今回の様なロジックが多い Custom Hooks は、1 ファイルに記述すると処理が追いづらいです。責務に応じてファイル分割する手法として、HOF を使いました。useEffect を利用する箇所は以下の様に切り出し、Component に展開する集約 Custom Hooks useIconDashboard でこれを実行します。
components/hooks/effects.ts
export default (
  records: Record[],
  state: State,
  update: Dispatch<SetStateAction<State>>,
  rotateTileContainer: ReturnType<typeof useRotateTileContainer>
) => {
  updateHitPoints(update, records, rotateTileContainer);
  updateIndexMapping(state, update);
};
components/hooks/useIconDashboard.ts
Effects(props.records, state, update, rotateTileContainer);useCallback で memoize する関数も同様にまとめます。こちらも Component に展開する集約 Custom Hooks で戻り値を object spread で展開します。
components/hooks/touchHandlers.ts
export default (
  state: State,
  update: Dispatch<SetStateAction<State>>,
  itemHeight: number
) => ({
  handleTouchStartElement: handleTouchStartElement(state, update),
  handleTouchMoveElement: handleTouchMoveElement(state, update, itemHeight),
  handleTouchEndElement: handleTouchEndElement(update),
});
components/hooks/useIconDashboard.ts
return {
  ...TouchHandlers(state, update, rotateTileContainer.itemHeight),
};
総括
memoize による再計算制御で、冒頭動画の様にスムーズに動く UI を実装することが出来ました。memoize はパフォーマンス向上に繋がる一方で「何故か更新されない」というバグを踏みやすいです。
今回はドラッグによるレイアウト更新アルゴリズムのみを実装しています。localStorage に indexMapping 配列を確保したり、長押しでドラッグモードに対応したりと、Custom Hooks を追加する事でより模倣した UI に近づくでしょう。2019/1Q に Hooks API が stable になるので、待ち遠しいですね。